Recommended Products
- Wine Opener KP1-36B1
 1.Best Seller in USA ,rewarded by Consumer Report in 2008.
2.Electric and rechargeable wine corkscrew, with two red charging lights
3.Easily opens up to 30 bottles fully charged with the touch of a button! Includes a foil cutter to remove seals
4.Charging time: 12hours for full capacity
5.Operating time: 8 seconds to pull out cork
6.Noise:<78db
7.Accessories: Foil cutter, rechargeable base
8.Material: ABS and silver paint
- Rechargeable Wine Opener KP3-36P6
 1.Blue light shines when in use or being rechargred 2.Open 30 bottles per fully charged. 3.Stylish stainless steel look. 4.Rechargeing base and foil cutter included. 5.LED Lighting.
- KP1106
 1.Rechargeable Wine Opener and Vacuum Preserver
2.Wine Opener with thermometer takes wine temperature accurately
3.Electric wine opener easily opens up to 30 bottles fully charged!
4.It will take 20 seconds to vacuum a bottle automatically (No manual pumping required)
5.Charging time:12 hours for full capacity
6.Beautiful Blue light will be on in use and charging
7.Material: Stainless Steel for wine opener and vacuum preserver, ABS fo
- Battery Operated Electric Wine Opener KB1-601901A
 1.Easy to use: open wine bottles in seconds 2.Modern outlook: exquisite texture and shining curve pattern 3.Long product life for opening 1000 bottles 4.Energy-saving technology: open up to 100 bottles with 4 AA Alkaline battery (batteries not included)
- Luxurious Series Wine Opener KP1-36N2
 1.Elegant charging base with foil cutter 2.LED light in unit keeps flashing when in use 3.Rechargebale light in charging base will be on when corkscrew is being recharged 4.Visual uncorking process 5.Product size:9.2*12.7*26.5cm
- Wine Opener and Wine Preserver Set KP-1108
 1.Three in one- Rechargeable Wine Opener and Vacuum Preserver and Pourer Set
2.Wine Opener with thermometer takes wine temperature accurately
3.Electric wine opener easily opens up to 30 bottles fully charged!
4.It will take 20 seconds to vacuum a bottle automatically (No manual pumping required)
5.Charging time:12 hours for full capacity
6.Shinning Blue light will shine in use and charging
- Rechargeable Electric Wine Set - KGS-KP3-361801C-1
 1. Electric wine opener set with nice packaging
2. Small sized wine opener, portable and rechargeable
3. One stop solution for wine opening, pouring and preserving
Including: KP3-361801C rechargeable electric wine opener, foil cutter, wine pourer, vacuum stoppe
Top articles
- How to use the rechargeable Portable vacuum cleaner
- How to use the car vacuum cleaner?
- What products are you manufacturing?
- How to Use Electric Wine Opener?
- How many years the wine opener can be used?
- How to use the wine opener after removing the foil cover from the bottle?
- What’s the foil cutter used for?
- Why KLT is the leader in Electric Wine Opener in the world?
- What certificates need if export to European countries?
- What are the advantages of Electric Wine Opener vs traditional manual corkscrew?
Latest articles
- kelitong-BBB
- How to use the rechargeable Portable vacuum cleaner
- How to use the car vacuum cleaner?
- What products are you manufacturing?
- How to Use Electric Wine Opener?
- Welcome to Kelitong Canton Fair Booth
- KLT Cooperates with Hai Di Lao Hot Pot
- KLT Sales Team Tripped to Thailand
- How to keep wine fresh
- Electric Tie Rack help you be a good man
Your browsing history

How to use the rechargeable Portable vacuum cleaner
The structure of the rechargeable portable vacuum cleaner
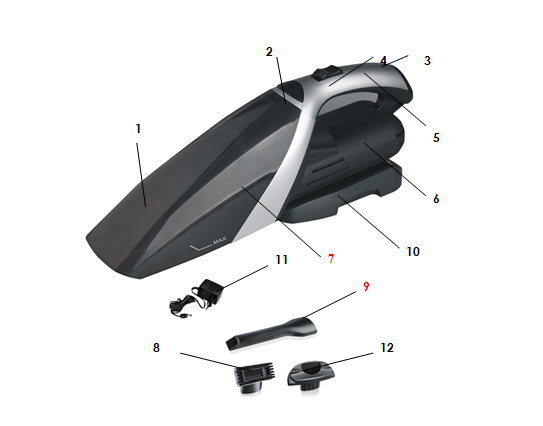
1. Dust collector
2. Release button
3. Pilot light
4. ON/OFF switch
5. Handle
6. Motor unit
7. Motor protection filter
8. Brush
9. Crevice tool
10. Wall-mounting bracket
11. Charger
12. Squeegee
CHARGING THE VACUUM CLEANER
Before using your vacuum cleaner for the first time, charge the battery during approximately 16 hours. A fully charged battery will give approximately 10 to 12 minutes vacuum cleaning.
The charger should only be connected to a 230V, 50Hz power supply.
Important: The charger and its cord cannot be repaired. Should they be damaged, they must be thrown out. Contact the customer service to replace them.
Put the "jack" plug of the charger in the opening foreseen underneath the wall-mounting bracket and rotate it until it is firmly attached to the bracket .
Insert the vacuum cleaner on the bracket with its handle facing down (a hook at the back of the appliance allows you to attach it easily to the bracket). Make sure the "jack" plug enters the appliance in the opening foreseen in the back of the appliance. Insert the plug of the charger into a 230V wall socket. The charging indicator will come on, indicating that the vacuum cleaner is positioned correctly on the bracket and that the charging process will start. The charging indicator will stay illuminated even if the battery is fully charged.
You can leave your appliance on the bracket for a long time without any risk of deterioration.
Do not charge the battery if the room temperature falls below 32°F or rises to more than 98.6°F.
The charger will warm up during use. This is perfectly normal. It will cool down as soon as the charging process is over.
USE
Once your appliance is charged, remove it from the bracket by holding it by its handle. Switch it on by sliding the ON/OFF switch forward. Tilt the vacuum cleaner till the nozzle of the dust collector is placed horizontally compared to the surface that is to be cleaned. When you are finished, slide the ON/OFF switch backward to switch off the appliance.
Practical hint: your appliance is equipped with a small crevice tool, which also serves as a base for several attachments. You can also use this crevice tool to avoid scratching the nozzle of the dust compartment.
To clean surfaces that are difficult to reach, use one of the crevice tools supplied. Caution: the large crevice tool cannot be attached directly to the appliance, but must first be fitted to the small crevice tool, that can then be attached to the appliance. To clean flat damp surfaces, use the squeegee directly mounted on the dust compartment.
MAINTENANCE
· Cleaning the filter and the dust collector is extremely important as it allows the optimal use of your appliance and eliminates the unpleasantness due to bad smells that can occur after having vacuumed liquids or humid particles.
· Remove the dust collector by pressing the release button situated on top of the appliance. We advise you to do this over a dustbin.
· Remove the filter and its holder
· Empty the dust compartment and clean it with soapy water if necessary.
· To clean the filter you can detach it from its holder. Shake it or, if necessary, clean it in soapsuds. If you use soapsuds, rinse the filter and let it dry before putting it back into the appliance.
Once the filter is clean and dry, put it back in its holder (side covered by tissue facing the filter holder), and insert the filter holder in the dust collector. To do so, make sure the ribs in the dust compartment face the grooves situated on the edge of the filter holder. The correct position of the filter holder is extremely important, as it guarantees the tightness between the dust compartment and the motor.
· If the filter is too dirty or damaged it must be replaced. To do so, please contact the nearest customer service.
· After having replaced the filter, attach the dust compartment to the motor unit.